

Plugin System
Plugin Index
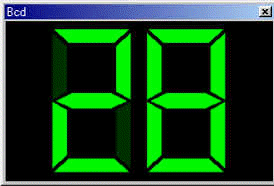
Bcd
Bcd Configuration
Button
Button Configuration
2 State Button
Setting
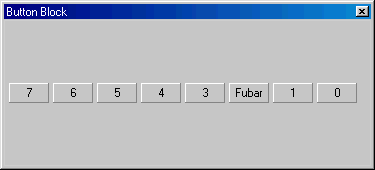
Button Block
Button Block
Configuration
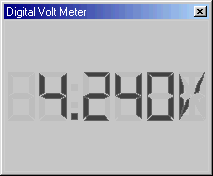
Digital Voltmeter
Digital
Voltmeter Configuration
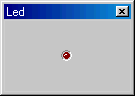
Led
Led Configuration
Led Block
Led Block
Configuration
Signal Generator
Signal
Generator Configuration
Stop Watch
Stop Watch Configuration
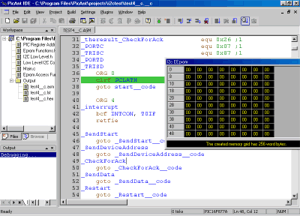
I2C EEPROM
I2C EEPROM
Logging
I2C EEPROM Configuration
Logic Analyzer
Logic Analyzer
Configuration
LCD
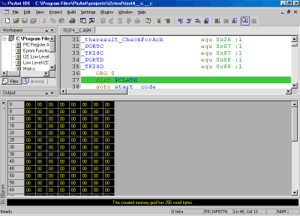
BCD Project
Button Project
Button Block Project
Led Project
Led Block Project
Digital Voltmeter Project
Signal Generator Project
Stop Watch Project
I2C EEPROM Project
Logic Analyzer Project
Appendix A: Plugin API
Appendix B: Daves Plugin Writing Guide
Legal Information
SourceBoost IDE features an extendable plugin system where each plugin emulates a physical device connected to the target. The standard SourceBoost IDE installation includes the BCD, Button, Button Block, Led and Led Block plugins. Other plugins are available to download as separate installations from http://www.sourceboost.com:
|
7 segment and 12 segment display with decoding |
|
Single button |
|
Block of 8 buttons |
|
Single LED |
|
Block of 8 LEDs |
|
Digital voltmeter |
|
Signal generator |
|
Stop watch |
|
I²C serial EEPROM |
|
Logic analyzer |
|
LCD |
|
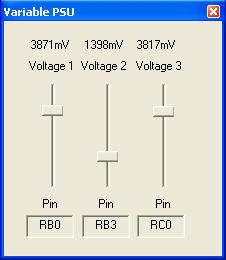
Analogue Voltage Source |
|
|
|
Docked
|
Floating
|
|
The BCD plugin simulates a double digit 7 or 12 segment LED and decoding circuitry that converts from 8 bit binary coded decimal to decimal, or from binary to hexadecimal dependent on configuration of the plugin. |
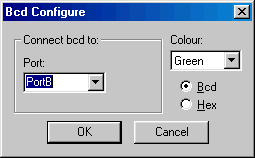 |
To configure, right click on the plugin window and select configure.
A popup like this will appear:
|
|
|
|
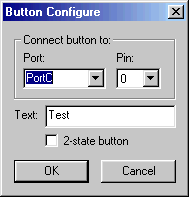
The button is a simulated switch connected to a pin as an input
device. When activated it causes the selected pin to go to a high state |
 |
|
This setting behaves the same for the button and button block plugins.
|
Off
|
On
|
A check box will make the button behave in one of two ways: When not checked it will act as a momentary switch, only closing while pressed. When checked it must be pushed to turn on, and then pushed again to turn off. |
|
The Button Block simulates a group of labeled switches connected to a port. |
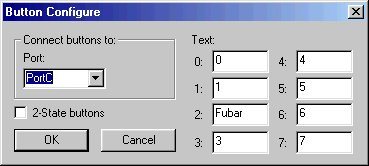 |
To configure, right click on the plugin window and select configure.
A popup like this will appear:
|
The 2 State Button Setting are the same as for the button plugin.
|
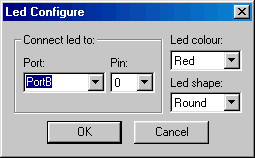
The Led plugin simulates a single Led connected to a pin. |
 |
|
| |
The Led Block simulates a block of 8 Leds connected to one port. |
 |
|
|
This plugin simulates a digital voltmeter reading the voltage on one pin. |
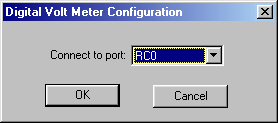 |
To configure, right click on the plugin window and select configure.
|
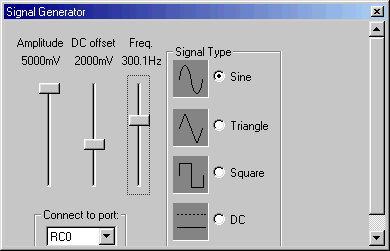
The Signal Generator plugin simulates a signal function generator used to provide specifically defined signal to one input pin.
One of four possible wave forms to be generated is selected that can be modified with three slider bars:
The amplitude (voltage) of the signal can be adjusted from
0V to 5V in increments of 1mV. This measurement is
peak-to-peak for all signal forms except DC. Amplitude is the only
slider bar active when DC is selected and it is measured from Vss.
Dc offset is the distance to the center of the signal to 0V.
This slider is inactive when the DC signal is selected.
The frequency for the signal can be set (except for DC )
ranging from .1 Hz to
20 KHz
The pin to send the signal to must be selected.
|
|
|
|
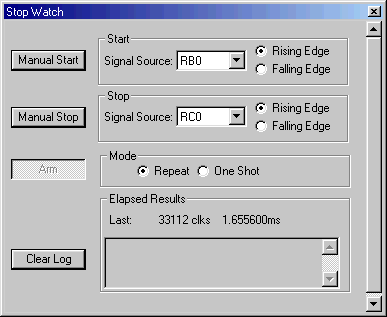
The stop watch can be used to measure time between events measured in both milliseconds and clocks ticks.
The stop watch can be started or stopped either manually or automatically.
To manually time an interval step to point where the timing is to begin and press the "Manual Start" button, then step to point where the timing is to end and press the "Manual Stop" button Time intervals can be measured very precisely using this method.
Timing can be triggered automatically by selecting a start and stop source. A radio button selects between when the signal on the pin is rising or falling. another radio button allows the user to determine if the event is timed the first time it happens (One Shot) or every time it happens (Repeat).
If Repeat is selected every interval is logged.
If One Shot is selected once the point of the program has been stepped to the Arm button must be pressed to measure the next time the event happens. This allows bypassing other points in the program that would trigger the start.
Any combination of automatic and manual can be used to start or stop the timing.
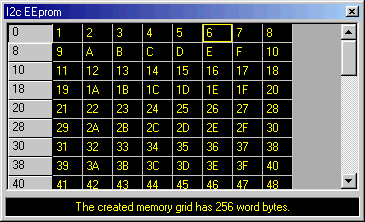
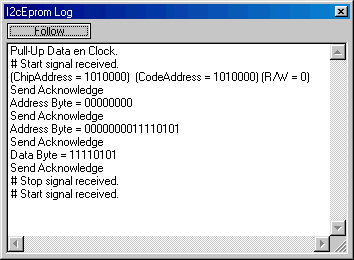
This plugin simulates a Electrically Programmable Read Only Memory chip that is programmed using the Inter-Integrated Circuit. (I²C) serial protocol. With the I²C EEPROM plugin you can simulate a basic I²C EEPROM device such as the 24LC256.
I²C was developed by Phillips electronic in the 1980s so chips would have a simple method of communicating with just a two wire bus. For more information about the I²C protocol see the Phillips website or the Microchip 24AA256/24LC256/24FC256 datasheet
The following operations are supported by the plug-in.
Byte write
Random Read.
Page write (Not yet supported.)
Current Address Read (Not yet supported)
Sequential Read (Not yet supported)
The Information Bar is the bar across the bottom of the plugin
window.
The Information Bar shows current information about the plug-in such as:
Information about the selected cell.
You can choose to display the word or the word address with the right click menu.
The created memory size.
(Error) messages that indicate the state of the plug-in.
The created memory size
|
|
The data can be saved to file by right clicking on the plugin window and selecting "save log to file"
 |
To configure, right click on the plugin window and select configure. A popup like this will appear: |
 |
Selecting "Configure..." will bring up a popup like this:
|
If you select a word in the memory grid the selected word or word address can be displayed on the Info-bar with decimal, hex or binary formatting.
%dec will be replaced with the decimal value.
%hex will be replaced with the hex value.
%bin will be replaced with the binary value.
If the Address Bytes are set to 2 the binary value will be 16 bits long.
You can choose to display the word or the word address with the right click menu.
The Address Bytes setting determines the number of bytes the
memory chip will be expecting. The number of Address Bits determines
the size of the memory.
( 2addressbits) The plug-in has a memory limit of 65536*8 (524.288K Bit).
216= 65536 is the calculation if the address is 16 bits long.
So you can set the memory like this:
Address bytes setting = 2 (2*8bit)
Address Bits setting = 16bit
With these settings the result would be 216 = 65,536 bytes.
(64k)
Address bytes setting = 2 (2*8bit)
Address Bits = 15bit
With these settings the result would be 215 = 32,768 bytes
(32k)
Address bytes setting = 1 (1*8bit)
Address Bits = 8 bit
With these settings the result would be 28 = 256 bytes
The number of bytes displayed per row can also be set.
|
|
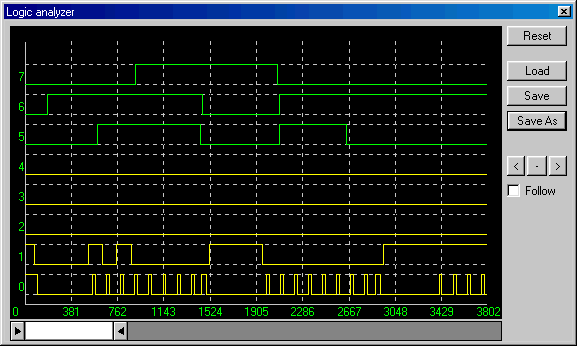
A logic analyzer is used to plot a graphical representation of a ports input and output states against time. The high and low state are the only one represented; the high impedance state is not represented
Outputs are written to to the plugin by the MCU.
Inputs are programmed into the plugin by clicking on the signal trace where it crosses the time mark the logic state is to change.
The scroll window: ![]() determines how much of the actual graph is displayed at once
determines how much of the actual graph is displayed at once
Dragging the arrows changes the range of the graph displayed.
Dragging the white space between the arrows moves the part of the graph being displayed.
The "Save" and "Save As" button allows the current data to be saved to file.
The load button allows a file that has been previously saved to be reloaded
When the "Follow" box is checked the scroll window will move to continuously display the time line currently being executed.
The ![]() button moves the
part of the graph being displayed to the left.
button moves the
part of the graph being displayed to the left.
The ![]() button returns
the displayed area to zero.
button returns
the displayed area to zero.
The ![]() button moves the
part of the graph being displayed to the right.
button moves the
part of the graph being displayed to the right.
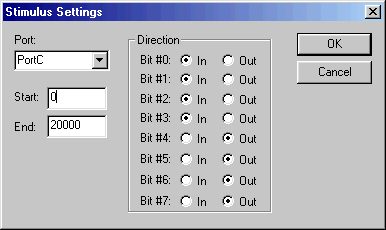 |
To configure, right click on the plugin window and select configure. A popup like this will appear: |
Choose the port to be analyzed and configure the bits as needed
Remember, this is from the MCUs perspective.
Select the staring and ending point s to be logged
This is in clock ticks from the start of the program.
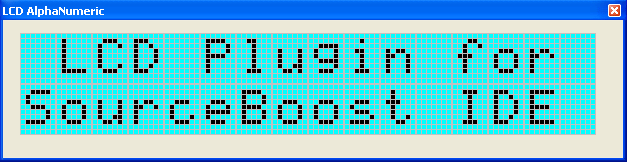
The LCD plugin simulates the industry standard Hitachi HD44780 LCD controller and an LCD display in a choice of different display sizes. The HD44780 display controller has a parallel interface that consists of 8 data lines and three control lines. Look here for more information about the LCD plugin.
The SourceBoost IDE plugin system has an open API described below. Starting from version 2.00 (corresponding to SourceBoost 5.4) API was changed to be compiler independant (CWnd* replaced by HWND). To work, a plugin DLL must be placed into the same directory where the SourceBoost IDE is installed. When SourceBoost IDE starts it scans its installation directory and loads all plugin DLLs found there.
A SourceBoost IDE plugin is an event driven system where each of its interfaces correspond to an event. Not all interfaces described here are required for a plugin. Only plgVersion, plgCreate, plgFree and plgName must be implemented. Others are optional.
The Plugin API uses the concept of pins and connections. The simulated processor core has pins that provide connection points to the outside world - just like the real device. Each pin can have zero or more connections made to it. When a pin has connections made to it, the simulator computes the pin voltage based on the interaction of the applied voltages and impedances.
PLUGIN_API int plgVersion( void )
Return api version. Must return 200 which means version 2.00.
Creates plugin window and returns its HWND.
Don't access simulator from this
function since when this interface gets called the simulator object doesn't exist.
Use the SupplyFuncPtr in conjuction with the ResolveFuncPtrs
function declare in the pluginAPI header file.
The key here is the use it to resolve the functions, ResolveFuncPtrs returns
true if successful eg:
...
if ( ResolveFuncPtrs( SupplyFuncPtr ) ) // resolve function pointers
{
// all function pointers resolve - complete initialization
..
}
else
{
// Handle error - initialization needs aborting
...
}
Once the function pointers have been resolved the following can be called else where in the code:
void GetRegHandle( char* name, HANDLE* hReg )Get register handle from a register name.
Get register value.
void SetRegVal( HANDLE hReg, int val )Set register value.
void AddRegChangeCallBack( HANDLE hReg, REGCHGCALLBACK pfunc, void* pParam, int iParam )Register a callback function that gets called when register hReg is changed.
Unregister a callback function that gets called when register hReg gets changed.
Apply a connection to a pin using this pin name. The pin handle will be in the hConnection upon function
return. Making a connection is just like connecting wires to this pin.
Release a connection and pin handle. Releasing the connection takes the applied voltage away, only release if
the connection to the pin is no longer required - releasing is just like pulling the wires out.
Set voltage on pin.
Set the externally applied voltage levels impedance. “0” means that pin voltage is exactly the external voltage
value. “-1“ means infinite impedance so the pin voltage is whatever is generated inside the PIC. When driving a pin from outside
use typically 5 to 50 ohm and when trying to read the voltage on a pin 10M ohm:
...
SetConnectionR( hConnection, 50 ); // for typical instrument drive
SetConnectionR( hConnection, 10000000 ); // for typical instrument input load
Get pin voltage.
Register a callback function that gets called when pin voltage gets changed.
pParam and iParam are passed through to the function that is callback. These can
help simplify some of the plugin coding.
Unregister a callback function that gets called when pin voltage gets changed.
The parameter list here must match that used when AddPinVChangeCallBack function
was called, or the callback will not be removed.
Get the current CPU clock value.
Lock simulator. This should be called when simulator access
functions get called as a result of GUI activity. The locking process causes the
simulator to effectively stop, so the plugin can access simulator data with fear
of it changing. Also while the simulator is locked non of the callback functions
get called.
Functions in the plugin that get called through the callback mechanism do not
need to called the lock function before using the simulator access functions
Unlock simulator. This function is complementary to the the Lock
function. This function should be called after the simulator data access
functions have been called to allow the simulator to resume execution.
This interface gets called either when a debug session gets started and this plugin window is visible or
when this plugin window gets visible during a debug session. Perform all necessary initialization that
requires assess to the simulator (i.e. getting handles to the registers and pins and registering callbacks).
This interface gets called either when a debug session gets stopped and this plugin window is visible or
when this plugin window gets closed during a debug session. Perform all necessary un-initialization that
requires assess to the simulator (i.e. releaseing handles to the registers and pins and un-registering callbacks).
Called when ide exits to give a plugin change to do necessary cleanups. Don't access simulator from this
function since when this interface gets called the simulator object doesn't exist.
Plugin should return its name. This name will be used in the plugin window title and plugin menu.
Plugin is expected to show a dialog where its parameters get configured by a user.
Plugin should use this interface to store its settings that are persistant between plugin creations. Such settings may be
for example a pin name this plugin is connected to or its colour. If this function gets called with a NULL parameter plugin should just
return the size of a buffer enough to store its state data. If buf is not NULL that it's a pointer to buffer where plugin should store
its settings data. Ide will save this information in the registry.
Plugin should use this interface if it needs to handle step back and store its state data required to recreate
its state when a step back occurs. If this function gets called with a NULL parameter plugin should just return the size of a
buffer enough to store its state data. If buf is not NULL that it's a pointer to buffer where plugin should store its state data.
Ide will save this information in the registry.
Plugin should initialized itself from the data pointed by buf.
Plugin should use this interface if it needs to handle step back and store its state data required to recreate
its state when a step back occurs and if it implements the plgSaveState interface. Plugin should initialized itself from the
data pointed by buf.
Called when target is being reset
Called when code is being stepped (over, in, back or out).
PLUGIN_API void plgClock( long clk, void *pParam )Called every clock cycle.
Called every time an instruction is executed.
Called at start of debugging and when the target clock rate is changed.
Follow these and you should end up with a happy plugin, don't use these and you may end up with deadlocks, and you plugin will become most unpopular.
Q) What can easily cause problems when writing a plugin?
A) Multi-threading is the problem, separate threads of execution can do there own thing in there own time. They can share data, which is where the danger is created. Two threads could be changing the same variable at the same time, this can cause data to become corrupt, and may crash the system.
Q) How do I make good multithreading code?
A) Using lock objects allows one thread to flag to another that it has exclusive access to an object. This prevents two threads from accessing the same data at exactly the same time.
Q) How do I lock the simulator during access from my plugin?
A) Use the Lock function, and after the access is complete use the Unlock function. The Lock function effectively pauses or blocks the simulator thread until the Unlock function is called.
Q) What is a deadlock?
A) It is the result of multiple locks being shared by multiple threads. Put simply if thread A is waiting for thread B and thread B is waiting for thread A, then the threads are going no where - they are deadlocked.
Q) What creates deadlocks in a pluging?
A) The simulator runs its own thread of execution. On various events the simulator will callback the plugin to "let it know" that something has happened. If SourceBoost IDE GUI thread locks has the GUI locked and tries to access the simulator, and simulator is calling back a plugin, and the plugin tries access some GUI functions, the plugin waits forever, and so does GUI thread - I hope thats clear.
Q) How do I avoid a deadlock in a plugin?
A) Follow Dave's carefully, and hopefully deadlocks at least will be avoided.
If you like your C++ programming then create some classes based on the following, that makes it clearer and easier to implement the rules:
1) VIEW means a class or group of functions and data that can repaint the display. This code is only ever called by the GUI thread.
2) DATA means a class or group of functions and data that holds and operates on key plugin data. The key data is that which the plugin reads or writes to the simulator. For example the voltage applied to a pin of the simulated target device.
3) VIEW can access DATA, DATA should provided access functions for this purpose (this helps to keep it clear and obvious).
4) DATA implements lock/unlock on VIEW accessed functions.
DATA needs no lock/unlock around simulator callback-only accessed functions. This is because the simulator thread will never be in these, when VIEW GUI thread is modifying data (because of the lock function stopping simulator at a know point).
5) Changes in DATA can cause GUI updates indirectly by DATA posting messages using the thread safe Windows API function postmessage. When VIEW processes theses it can safely read DATA through its access function as DATA has locks in place.
THERE IS NO WARRANTY FOR THE PROGRAM, TO THE EXTENT PERMITTED BY APPLICABLE LAW. EXCEPT WHEN OTHERWISE STATED IN WRITING THE COPYRIGHT HOLDERS AND/OR OTHER PARTIES PROVIDE THE PROGRAM "AS IS" WITHOUT WARRANTY OF ANY KIND, EITHER EXPRESSED OR IMPLIED, INCLUDING, BUT NOT LIMITED TO, THE IMPLIED WARRANTIES OF MERCHANTABILITY AND FITNESS FOR A PARTICULAR PURPOSE. THE ENTIRE RISK AS TO THE QUALITY AND PERFORMANCE OF THE PROGRAM IS WITH YOU. SHOULD THE PROGRAM PROVE DEFECTIVE, YOU ASSUME THE COST OF ALL NECESSARY SERVICING, REPAIR OR CORRECTION.
IN NO EVENT UNLESS REQUIRED BY APPLICABLE LAW OR AGREED TO IN WRITING WILL ANY COPYRIGHT HOLDER, OR ANY OTHER PARTY WHO MAY MODIFY AND/OR REDISTRIBUTE THE PROGRAM AS PERMITTED ABOVE, BE LIABLE TO YOU FOR DAMAGES, INCLUDING ANY GENERAL, SPECIAL, INCIDENTAL OR CONSEQUENTIAL DAMAGES ARISING OUT OF THE USE OR INABILITY TO USE THE PROGRAM (INCLUDING BUT NOT LIMITED TO LOSS OF DATA OR DATA BEING RENDERED INACCURATE OR LOSSES SUSTAINED BY YOU OR THIRD PARTIES OR A FAILURE OF THE PROGRAM TO OPERATE WITH ANY OTHER PROGRAMS), EVEN IF SUCH HOLDER OR OTHER PARTY HAS BEEN ADVISED OF THE POSSIBILITY OF SUCH DAMAGES.
THE AUTHOR RESERVES THE RIGHT TO REJECT ANY LICENSE (REGISTRATION) REQUEST WITHOUT EXPLAINING THE REASONS WHY SUCH REQUEST HAS BEEN REJECTED. IN CASE YOUR LICENSE (REGISTRATION) REQUEST GETS REJECTED YOU MUST STOP USING THE SourceBoost IDE, C2C-PLUS, C2C++, P2C-plus and BoostC COMPILERS AND REMOVE THE WHOLE SourceBoost IDE INSTALLATION FROM YOUR COMPUTER.